PLEASE NOTE: These instructions are for customers of Network Solutions, Inc. We have noticed that several customers of Network Solutions, LLC. have come across these instructions and have not been successful at making these work (because they won’t). If you are a customer of Network Solutions, LLC., you should go to their web site at http://www.networksolutions.com to find the correct instructions.
NOTE 2 (December 17, 2014): The screenshots in this post have incorrect information. The text is correct. We are working to change the screenshots shortly.
Google is making strides in the smartphone marketplace and the Android based devices are becoming very common.
Android-based smartphones and devices include two email clients, one for Gmail and one for other types of email servers including Microsoft Exchange, IMAP and POP3. The following guide will show you how to set up the built-in email application to access an IMAP or POP3 (we support both)email server for incoming email and an SMTP server for outbound email. The setup for both IMAP and POP3 is the same so for the purposes of this guide, we will use POP3. See the page on https://www.netsolinc.com/email-settings-2 for the IMAP settings including server names and port numbers. Please note that there are *MANY* different Android devices out now, so your screen may be slightly different. If you are unable to follow this guide and need further assistance, please call our technical support at 256-547-6817 or 877-886-6868.
- Tap the upward pointing arrow to get to the app menu (figure 1)
- Tap on the Email icon (figure 2)

- Enter your email address and password, then tap Next (figure 3)
- Select POP3 account (figure 4)

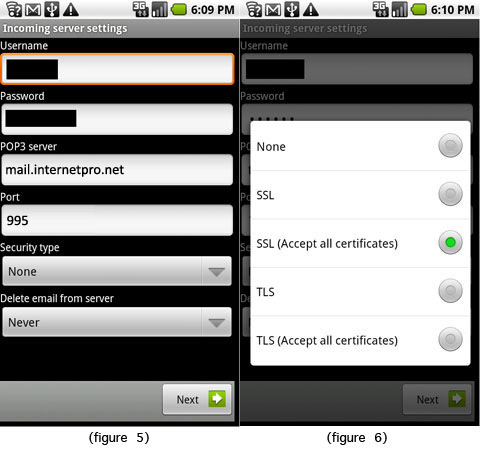
- Enter your Username, Password, POP3 server (pop.internetpro.net, etc) and Port (110) (figure 5)
- Click on Security type; a new window will pop up and allow you to select the level of encryption (None, SSL or TLS).
- Select TLS (not with Accept all certificates – the figure below is incorrect now) (figure 6)

- Once the Security type has been selected the pop up window will close and you can continue to the next step
- Select when to delete email from server; the options are “Never” or “When I delete from Inbox”, then tap Next (figure 5)
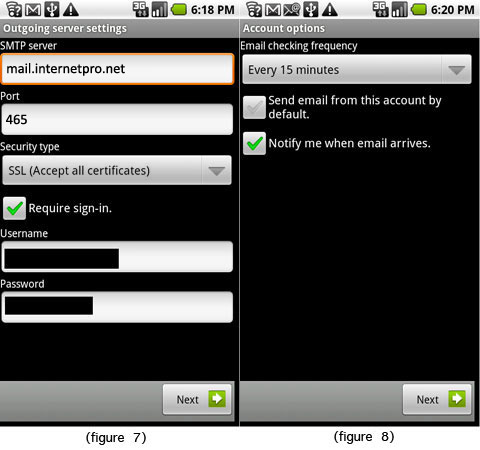
- Enter outgoing server settings which consist of SMTP Server (smtp.internetpro.net), Port (587), and security type (TLS – not with Accept all certificates – figure below is incorrect) (figure 7)
- Your outgoing or SMTP server requires you login so check the box next to Require sign-in, enter your email address and password, and tap the Next button
- Select email checking frequency and notification options ( figure 8 )

- Finally, name the account and input your display name (figure 9)
Email will begin synchronizing once the credentials and server information is entered correctly.
Once the setup has been completed, you are presented with a list of your messages. While viewing the message list, you are also able to change the settings that are assigned to this account by tapping the Menu icon — which is directly to the left of the Home icon — and then tapping Account settings. The following options are available:
- Account name – this is just a name to let you recognize the email account
- Your name
- Email check frequency – more often uses more battery
- Default account (make the current account the default email account on your Android device)
- Email notifications
- Select Ringtone
- Vibrate
- Incoming settings (to modify IMAP or POP3 server settings)
- Outgoing settings (to modify SMTP server settings)
