Blog

Web Server Problem

At 4:07 pm on Nov. 14, 2010, one of our web servers started presenting an FTP error.  At that time, users were not able to connect via FTP to update websites.  Or technicians responded to the problem within 5 minutes, but have not yet been able to isolate the issue.   At 4:45, the server was rebooted in an attempt to bring the FTP service back online.   At that time, all services were unavailable on that server.   The server came back online at 4:49 pm, however the FTP issue remains.   We are currently investigating the cause of the FTP problem, and hope to restore full service shortly.

Nov. 14  2010 5:18pm  – At 5:02, the outage escalated due to a misconfiguration of our main firewall.  Technicians were attempting to block the FTP DOS attack, and inadvertently blocked all traffic.   We are continuing to work on the problem.

Nov 14, 2010  5:30pm – Redundant firewalls have all been restored.  Looks like everything is up and running.  Our technicians are continuing to check.

Nove 14, 2010 5:38pm – The original FTP denial of service attack has now been resolved.  We are sorry for the inconvenience caused by this issue.  If you see any problems that you believe may be related to this issue, please give us a call at 256-547-6817 or 877-886-6868 to let our technicians know about it.

2011-10-25T19:52:03-05:00November 14, 2010|News and Updates|Comments Off on Web Server Problem

Email Setup on Mac Mail (OS X 10.5 and higher)

  1. Open Mail (click it on the Dock or open it from the Applications folder).
  2. If the “Welcome to Mail” assistant does not appear, choose Add Account from the File menu.
  3. Fill in the Full Name, Email address, and Password fields.
    Note: Your email account password will be stored in Keychain and used automatically to login to your email account when you open Mail.
  4. Deselect “Automatically set up account” if it is available or enabled. Click Continue to proceed.
  5. Choose the Account Type. This will normally be POP unless you have been told otherwise.
  6. Give your account a useful description, such as your email address or “My Network Solutions email”. It can be called whatever you want.
  7. Enter your Incoming Mail Server which is pop.internetpro.net, email address and password.  Note that by default, your user name will automatically be filled in with the first part of your email address. Make sure that the User Name field contains your entire email address in all lower case letters.
  8. Click on Continue to proceed.
  9. For Outgoing Mail Server, a useful description such as  the server name or “Network Solutions Email Server”.
  10. Enter your outgoing mail server which is smtp.internetpro.net.
  11. Select “Use Authentication” and enter your Email Address and Password. Click Continue to proceed.
  12. If prompted, enter your Outgoing Mail Security settings. Click Continue to proceed.
  13. Verify your settings in the Account Summary. Check “Take account online”. Click “Create” to complete the process.

After completing these steps you should be able to send and receive email via this account. If you can’t send or receive email, please call us at 256-547-6817 or 877-886-6868 for assistance.

2012-02-24T21:30:40-06:00November 11, 2010|Documentation, FAQ, Internet|Comments Off on Email Setup on Mac Mail (OS X 10.5 and higher)

Email Setup on Android Device

PLEASE NOTE: These instructions are for customers of Network Solutions, Inc.  We have noticed that several customers of Network Solutions, LLC. have come across these instructions and have not been successful at making these work (because they won’t).   If you are a customer of Network Solutions, LLC., you should go to their web site at http://www.networksolutions.com to find the correct instructions.

 NOTE 2 (December 17, 2014): The screenshots in this post have incorrect information.  The text is correct.  We are working to change the screenshots shortly.


Google is making strides in the smartphone marketplace and the Android based devices are becoming very common.

Android-based smartphones and devices include two email clients, one for Gmail and one for other types of email servers including Microsoft Exchange, IMAP and POP3. The following guide will show you how to set up the built-in email application to access an IMAP or POP3 (we support both)email server for incoming email and an SMTP server for outbound email. The setup for both IMAP and POP3 is the same so for the purposes of this guide, we will use POP3.  See the page on https://www.netsolinc.com/email-settings-2 for the IMAP settings including server names and port numbers.  Please note that there are *MANY* different Android devices out now, so your screen may be slightly different.  If you are unable to follow this guide and need further assistance, please call our technical support at 256-547-6817 or 877-886-6868.

  • Tap the upward pointing arrow to get to the app menu (figure 1)
  • Tap on the Email icon (figure 2)

Alternate Text

  • Enter your email address and password, then tap Next (figure 3)
  • Select POP3 account (figure 4)

Alternate Text

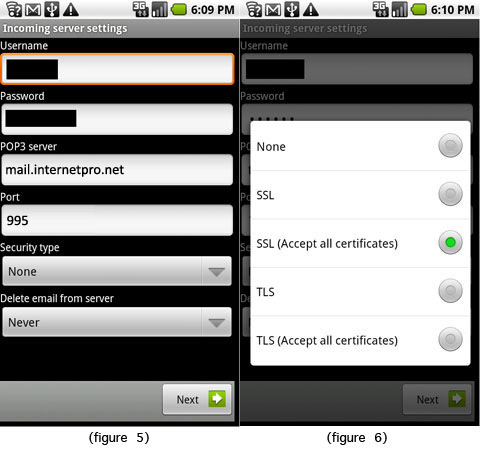
  • Enter your Username, Password, POP3 server (pop.internetpro.net, etc) and Port (110) (figure 5)
  • Click on Security type; a new window will pop up and allow you to select the level of encryption (None, SSL or TLS).
  • Select TLS (not with Accept all certificates – the figure below is incorrect now) (figure 6)

  • Once the Security type has been selected the pop up window will close and you can continue to the next step
  • Select when to delete email from server; the options are “Never” or “When I delete from Inbox”, then tap Next (figure 5)
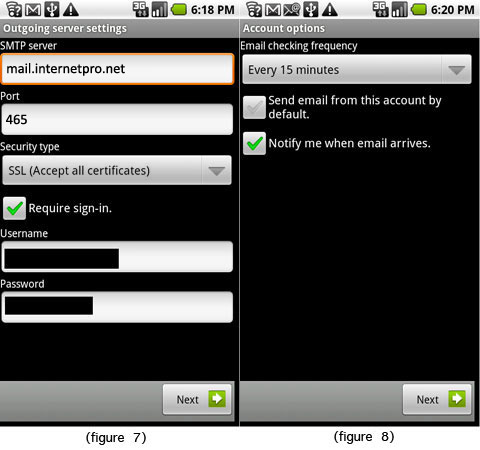
  • Enter outgoing server settings which consist of SMTP Server (smtp.internetpro.net), Port (587), and security type (TLS – not with Accept all certificates – figure below is incorrect) (figure 7)
  • Your outgoing or SMTP server requires you login so check the box next to Require sign-in, enter your email address and password, and tap the Next button
  • Select email checking frequency and notification options ( figure 8 )

  • Finally, name the account and input your display name (figure 9)


Email will begin synchronizing once the credentials and server information is entered correctly.

Once the setup has been completed, you are presented with a list of your messages. While viewing the message list, you are also able to change the settings that are assigned to this account by tapping the Menu icon — which is directly to the left of the Home icon — and then tapping Account settings. The following options are available:

  1. Account name – this is just a name to let you recognize the email account
  2. Your name
  3. Email check frequency – more often uses more battery
  4. Default account (make the current account the default email account on your Android device)
  5. Email notifications
  6. Select Ringtone
  7. Vibrate
  8. Incoming settings (to modify IMAP or POP3 server settings)
  9. Outgoing settings (to modify SMTP server settings)
2014-12-17T22:49:21-06:00November 8, 2010|Documentation, FAQ, Internet|Comments Off on Email Setup on Android Device

Spam System Upgrades

Nov. 3 2010 – Over the past few weeks we have noticed a huge increase in the volume of spam.  Although our system does a great job of recognizing spam messages, we found that it was being overloaded by the sheer volume of messages coming in.  We have seen many instances where our spam scanning had timed out causing spam email to come through untagged.  We have just brought an additional spam scanning server online to address this issue.   We are also making changes to the configurations of our spam servers in the hope that we will get more consistent and accurate spam tagging.

Nov. 4  2010  – The new server is now fully online and operational, sharing the learned spam database with all of the other servers.  In the past, each of our servers had maintained their own independent database, but those are now consolidated.  This consolidation will allow the database to grow faster (taking advantage of all servers at once) and to be the same across all the servers, resulting in more consistent tagging.  We hope everyone enjoys the improvements!

2011-10-25T19:48:46-05:00November 3, 2010|Internet, News and Updates|Comments Off on Spam System Upgrades

Planned Maintenance

AT&T Network Engineers will be performing a planned maintenance on Birmingham-Alabama
Access Router 1. The work will be performed on 11/18/2010, during the maintenance
window of 12:00AM-6:00AM, local time. AT&T's goal is to successfully complete the
task and restore service within the stated time frame.

We apologize for any inconvenience that you may experience.
We expect service to be impacted somewhat during the maintenance window.

AT&T Engineers will be performing an IOS upgrade.
2011-10-25T19:52:11-05:00November 3, 2010|News and Updates|Comments Off on Planned Maintenance

Planned Maintenance

AT&T Network Engineers will be performing a planned maintenance on
Birmingham-Alabama Access Router 1. The work will be performed on 10/5/2010,
during the maintenance window of 12:00AM-6:00AM, local time. AT&T's goal is
to successfully complete the task and restore service within the stated time frame. 

We apologize for any inconvenience that you may experience.
We expect service to be impacted somewhat during the maintenance window.

AT&T Network Engineers will be performing a router reload.
2011-10-25T19:52:26-05:00September 21, 2010|News and Updates|Comments Off on Planned Maintenance

Internet Outage

Sept 3, 2010 – We are experiencing an outage that started at 4:00pm.  We are working with AT&T on a resolution.  The ticket is currently in the testing stages and we do not know what the upstream issue is.   The problem is definitely outside our network, and we are waiting on news from the upstream providers in order to get an estimated time to repair.

Update 7:50 pm.  Looks like everything is back up. AT&T has still not informed us of what the problem was, but because of the Labor Day weekend they were slower than usual in their response.  We are working on adding an additional provider to add more redundancy since we cannot count on them.

Sept 4, 2010 – AT&T never did contact us about the resolution to the problem and they automatically closed their ticket.  However, this morning we are continuing to experience issues related to this problem.   As of 8:50am, most sites/services are being impacted.  We have re-opened a ticket with AT&T and are hoping they will work on this in a timely manner, but right now it does not seem like they want to work on a holiday weekend.

Update 11:25am  – Finally got some needed info from AT&T.  They have a major fiber cut between Anniston and Talladega due to construction work.   Estimated Time to Repair is 1:00pm CDT.   This issue is affecting a large area.

Update 11:31am – Well, that was quick.  They just told us 1:00, but everything just came online.

2011-10-25T19:52:33-05:00September 4, 2010|News and Updates|Comments Off on Internet Outage

Upgraded Alternate Webmail

We have upgraded our alternate webmail interface.   Our alternate interface can be found at https://webmail.internetpro.net.   We have just upgraded it to the newest version available.  This interface includes several advantages over our traditional interface, including an HTML editor and drag-and-drop ability using AJAX.   However, the alternate interface is not integrated into your email settings or your server-side filtering.  Feel free to try out either interface to see which one suits your needs better.

Update: We have added a button on our home page under the Online Email Center which links to the alternate interface. We hope you enjoy it.

2011-10-25T19:52:40-05:00September 2, 2010|News and Updates|Comments Off on Upgraded Alternate Webmail

Phone System Issue

As of 9:50am, our phones have gone out and we are unable to make outgoing calls or receive incoming calls. We are working with our telco provider to resolve the issue. If you have an immediate need, please email us at support@internetpro.net with a callback number.

10:20am – Our phone system is back online and we do not anticipate any additional issues.

2011-10-25T19:52:48-05:00August 31, 2010|News and Updates|Comments Off on Phone System Issue

Setting up Email on iPad

The iPad’s Mail App works with MobileMe, Microsoft Exchange, Yahoo! Mail, Gmail, AOL and other IMAP and POP3 email services. Once you have added one of these accounts to your iPad you will be able to send and receive photos, PDF’s, and other attachment types.  These instructions show you how to set up an email address which is hosted by Network Solutions, Inc.   Our email servers support both IMAP and POP3.


Setting Up Initial Email Account on the iPad

The following tutorial assumes you have never added an email account to your iPad.

Add Email Account to iPad

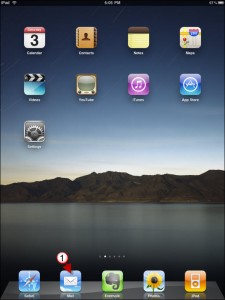
1. Tap on Mail.

how to add email account to ipad 12 225x300 How to Setup Email Accounts on the iPad

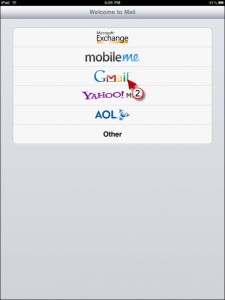
2. For the account type, choose “Other”

how to add email account to ipad 31 225x300 How to Setup Email Accounts on the iPad

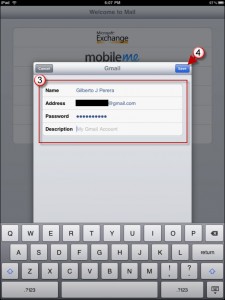
3. Enter your account information.  Your account name will be your entire email address in all lower case.   You can use either POP3 or IMAP for the account type.  See the page at https://www.netsolinc.com/email-settings-2 for the server settings of each type.   Please note that on Apple devices, it will indicate that the username and password for the outgoing (SMTP) server is Optional.  It is NOT optional on our servers if you want to send email.  Please fill out those blanks with the same credentials as you used for the incoming server.


4. Tap Save

Add more email accounts in iPad

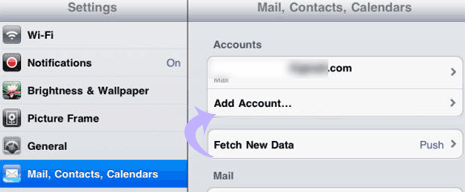
1. Tap ‘Settings’ icon on iPad home screen.

2. Then tap ‘Mail, Contacts, Calendar’ option in the left column.

3. Select ‘Add account’ option under ‘Account’ listing at the top of right column.

4. Follow the instructions for adding initial account above.

2014-12-17T22:52:58-06:00August 11, 2010|Documentation, FAQ|Comments Off on Setting up Email on iPad
Go to Top